


Whether you want to play with friends or create a small multiplayer world, there are several ways to make a Minecraft server on mobile. Some methods prioritize simplicity, while others offer greater control and customization. This guide compares the most practical options and helps you choose the one that best fits your needs.
Yes, you can make a Minecraft server on mobile, but the best method depends on your device and how you want to play.
- Minecraft Realms is the easiest option for most players, offering simple setup, official support, and minimal maintenance.
- A Minecraft hosting provider offers better performance, uptime, and flexibility, making it the best choice for larger or long-term multiplayer worlds.
- Android self-hosting with tools such as Termux can offer the most control and can be free, but it requires more technical knowledge and maintenance.
For iPhone and iPad users, Minecraft Realms or a hosted server is usually the most practical choice, as iOS isn’t designed to run dedicated servers in the background reliably.
Recommended Minecraft Hosting Providers
| Provider | User Rating | Best For | |
|---|---|---|---|
 | 4.8 | Performance | Visit Kamatera |
 | 4.8 | Affordability | Visit Godlike |
 | 4.6 | Ease of Use | Visit Hostinger |
Choose Your Minecraft Server Setup Method
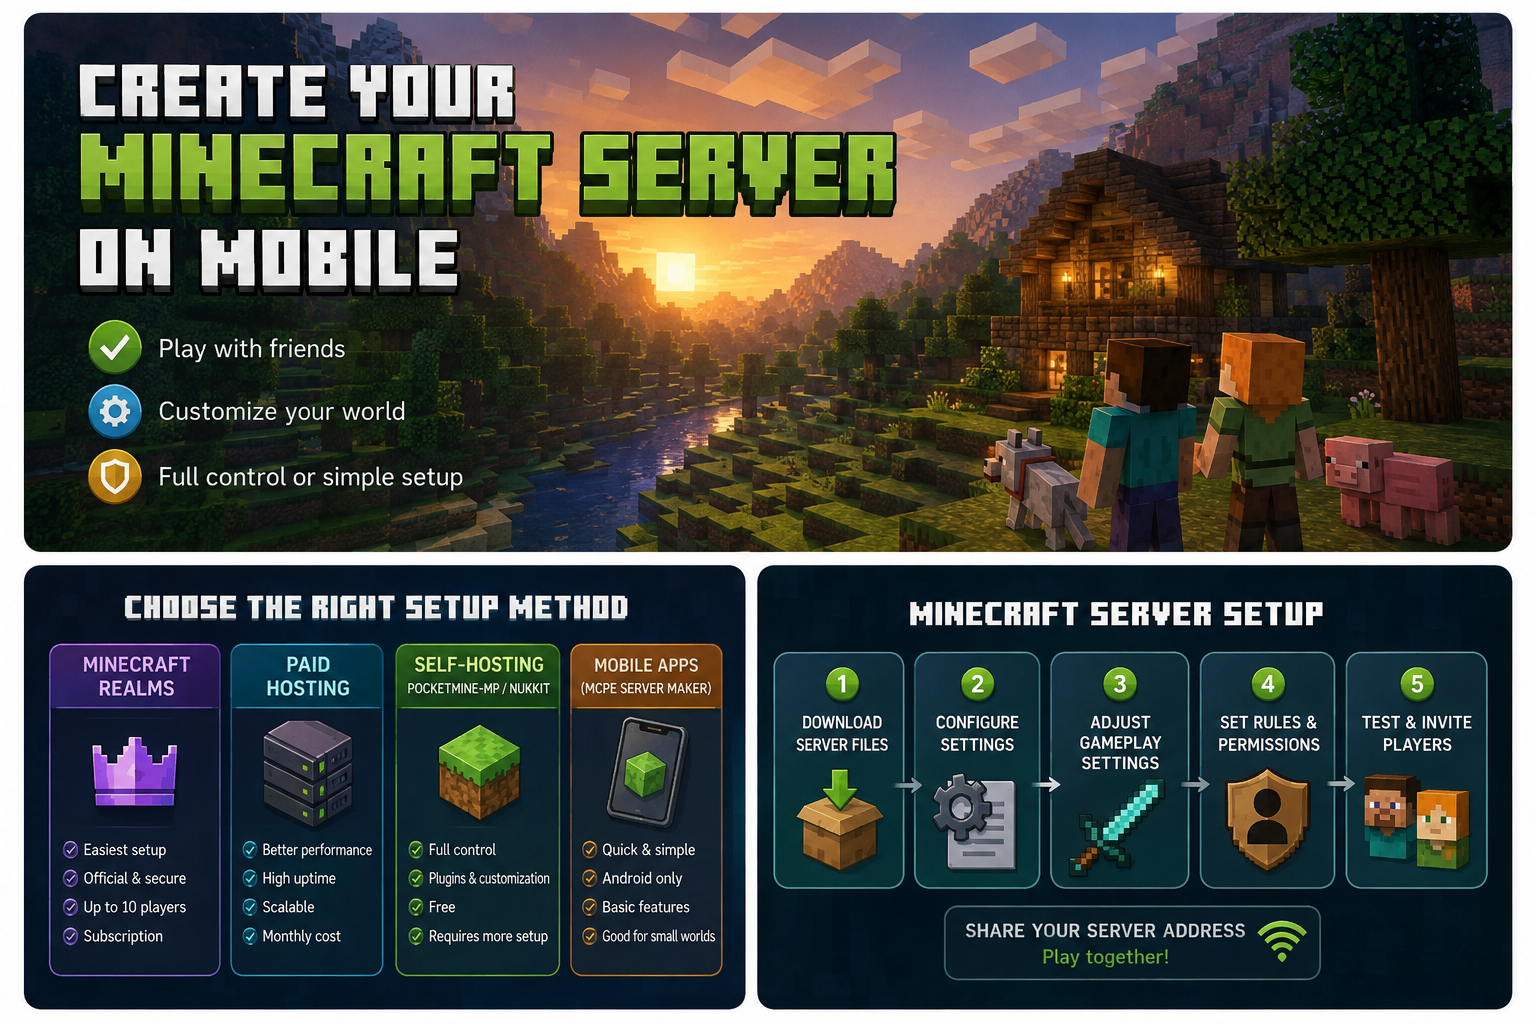
Before creating a Minecraft server on your mobile device, choose the setup method that best fits your needs. Some options provide a ready-to-use hosting service, while others require you to install and manage server software yourself.
Minecraft on Android and iPhone isn’t a separate edition. In fact, it’s Minecraft Bedrock Edition (formerly known as Pocket Edition or MCPE). That means most mobile players need a Bedrock-compatible server rather than a Java Edition server. Solutions such as Minecraft Realms and Bedrock hosting providers are designed for Bedrock gameplay, while server software such as PocketMine-MP and Nukkit are legacy options with important maintenance and compatibility limitations. Endstone is the official successor to Nukkit, but it is currently designed for Windows and Linux rather than Android.
- Choose Minecraft Realms if you want the easiest setup with automatic backups and minimal maintenance.
- Choose a paid Minecraft hosting platform if you want better performance, uptime, and reliable access for friends.
- Choose Android self-hosting if you need greater control over server settings and customization and are comfortable with a more technical setup.
- Choose a mobile server-maker app, such as MCPE Server Maker, if you prefer a quick setup directly on your Android device.
Explanation of Setup Methods for Mobile Devices
Here are some of the most common setup methods for creating a Minecraft server on a mobile device:
Minecraft Realms
Minecraft Realms is Mojang’s official subscription service for hosting private Minecraft worlds. It is the easiest option to set up and manage, making it ideal for families or small groups of friends. Automatic backups and minimal maintenance make Realms a good choice for beginners, although customization options are limited and worlds can only host up to 10 players at a time.
Paid Minecraft Hosting
Paid Minecraft hosting providers run your server on remote infrastructure while letting you manage it from any device, including your phone. This option offers better uptime, performance, and flexibility than running a server directly on a mobile device. It is ideal for players who want a server that friends can access anytime without relying on their phone being online.
PocketMine-MP
PocketMine-MP is a free, open-source server software designed for Minecraft Bedrock Edition. It supports plugins and extensive server customization, and was widely used by experienced users who wanted more control than Realms provides. However, it requires manual installation, configuration, and ongoing maintenance in exchange for greater flexibility and control.
Nukkit (Legacy)
Nukkit is another free third-party Java-based server software for Minecraft Bedrock Edition. It is now considered a legacy project and is no longer actively maintained. It focused on performance and stability while also supporting plugins and extensive server customization. Like PocketMine-MP, it requires more technical knowledge than hosted solutions but offers greater flexibility for advanced users, making it a solid choice for larger or more demanding servers.
MCPE Server Maker
MCPE Server Maker is an Android app that simplifies the process of creating a Minecraft server directly from a mobile device. It offers an intuitive interface and is suitable for quick testing or casual multiplayer sessions, although it offers fewer customization options and less flexibility than dedicated server software or paid hosting, making it better for beginners and casual players.
Comparison of Current Setup Methods
The table below compares the most common setup methods for creating a Minecraft server on a mobile device.
| SETUP METHOD | Strengths | Weaknesses | Ease of Use | Best For | Customization | Cost |
|---|---|---|---|---|---|---|
| Minecraft Realms | Official Minecraft solution, automatic backups, quick setup | Limited customization, low player count, monthly cost | Very Easy | Families and small groups of friends | Limited | Monthly subscription |
| Paid Minecraft Hosting | Better uptime and performance, always online, scalable | Monthly cost, requires choosing a hosting provider | Easy | Always-online multiplayer servers | High | Monthly fee |
| PocketMine-MP | Free, open source, plugin support, extensive customization | Retired, manual setup and maintenance, learning curve | Moderate | Experienced users who want full control | Extensive | Free |
| Nukkit (Legacy) | High performance, plugin support, extensive customization | Deprecated, more technical, requires manual setup and configuration | Moderate | Larger or more demanding servers | Extensive | Free |
| MCPE Server Maker | Quick setup, intuitive interface, beginner-friendly | Limited customization, less flexibility for larger servers | Very Easy | Beginners and casual players | Limited | Free (optional in-app purchases) |
Choosing the Right Setup Method
The best setup method depends on your experience, budget, and the level of control you need. If you want the simplest experience, Minecraft Realms is a great choice. If you prefer a server that’s always online with minimal maintenance, a paid Minecraft hosting provider may be the better option.
Choose Android self-hosting if you want more control and customization without paying for hosting, but be prepared to handle the installation, configuration, and ongoing maintenance yourself.
How to Make a Minecraft Server on Mobile for Free

Yes, it’s possible to make a Minecraft server on mobile for free, but every free option comes with trade-offs. While you can avoid monthly hosting fees, you’ll usually sacrifice uptime, performance, convenience, or customization. The best free solution depends on whether you want a temporary server for friends or a more permanent multiplayer world.
| Free Option | Pros | Limitations |
| Android self-hosting | Free, customizable, plugin support | Phone must be online, battery drain, requires setup |
| Free Minecraft hosting plan (if available) | Easy setup, no phone required | Limited RAM, storage, player slots, or uptime |
| Local/LAN play | Very easy, completely free | Only works on the same local network |
Self-hosting on Android is the most flexible free option because you have full control over the server software. However, your phone becomes the server, which means it needs to remain powered on, connected to the internet, and capable of handling both the game and the server at the same time.
Free hosting plans can be a convenient alternative if you don’t want to use your own device, but they often include restrictions such as limited RAM, storage space, player slots, or inactive-server timeouts. Availability also varies between hosting providers.
If you only want to play with friends on the same Wi-Fi network, local multiplayer is the simplest free solution because it doesn’t require a publicly accessible server or ongoing maintenance.
If you want a server that friends can join anytime without relying on your phone, a paid Minecraft hosting provider or Minecraft Realms is usually the more reliable choice. Your server stays online independently of your mobile device, while automatic backups, better performance, and easier management make long-term multiplayer much simpler.
Android vs. iPhone/iPad: Which Mobile Setup Works Best?
The best way to create a Minecraft server on mobile depends heavily on whether you use Android or iOS. Android devices provide more flexibility for self-hosting, while iPhone and iPad users will usually have a better experience with hosted solutions.
Creating a Minecraft Server on Android
Android is the better choice if you want to experiment with running a Minecraft server directly from your phone. The platform provides easier access to server files, terminal applications, and tools that can be used for self-hosting.
However, self-hosting on Android has limitations. Your phone needs to stay powered on and connected for players to access the server, which can drain battery, consume storage, and affect device performance. You may also need to configure network settings if players are connecting from outside your local network.
Creating a Minecraft Server on iPhone or iPad
iPhone and iPad devices are less suitable for running a dedicated Minecraft server because iOS limits background processes and does not reliably support always-on server software.
For most iOS users, Minecraft Realms or a hosted Minecraft server is the better option. These solutions allow friends to connect even when your phone is offline and avoid the battery, storage, and maintenance issues of self-hosting.
If you want to run a self-hosted server while playing on iPhone or iPad, consider hosting the server on another device, such as a PC, VPS, or dedicated Minecraft hosting platform.
Install and Configure the Server

Preparing Your Server Files
The exact steps for downloading your server files depend on the setup method you chose earlier. Hosted servers, local Android servers, and iOS devices all use different installation methods, so follow the instructions that match your setup.
Hosted Minecraft Server (Recommended)
- Sign in to your hosting provider’s control panel.
- Create a new Minecraft server or deploy a preconfigured instance.
- Access your server files through the file manager or FTP, depending on your host.
- Complete the initial setup from the hosting dashboard.
Android (PocketMine-MP)
- Download a compatible PocketMine-MP release from the official website.
- Follow the current Android installation instructions provided by PocketMine-MP.
- Use a compatible mobile terminal app or file manager to install and manage the server files.
- Start the server using the Android-supported launch method instead of Windows-specific files such as start.cmd.
- Check the compatibility information, as PocketMine-MP is no longer being updated for new Minecraft versions.
iPhone or iPad
For iPhone and iPad users, follow the Realms or hosted server setup instructions above, as iOS does not reliably support running dedicated Minecraft servers in the background.
Setting Up the Server Configuration
After installing your server software, you’ll need to configure a few basic settings before inviting players. Most Minecraft servers use a server.properties file or a web-based control panel where you can customize how the server behaves.
- Access the server settings: If you’re using a hosting provider, open the server management panel provided by your host. For PocketMine-MP, use
server.propertiesfor basic settings andpocketmine.ymlfor advanced server configuration. For other self-hosted solutions, use the configuration files or settings provided by the server software. - Set the server name and description: Choose a recognizable server name and, if supported, add a short description so players know what to expect before joining. This is also a good time to review the default settings created during installation.
- Configure the gameplay settings: Adjust options such as the game mode, difficulty, maximum player count, PvP, and other gameplay preferences. The ideal configuration depends on whether you’re creating a casual server for friends or a larger community server.
- Review network and security options: Verify the server port, whitelist, spawn protection, and any other security settings available for your server software. Taking a few minutes to review these options can help prevent unwanted access and improve the overall player experience.
- Save your changes: Once you’ve finished configuring the server, save the updated settings and verify that they were applied successfully. If your server software requires a restart, restart it before continuing with plugin installation.
Choosing and Installing Plugins or Mods

Plugins and mods extend your Minecraft server with additional features, but they aren’t interchangeable. The correct option depends on the server software you’re using, so always choose extensions designed specifically for your platform.
1. Choose compatible plugins or mods
If you’re creating a mobile Minecraft server, you’ll usually be running a Bedrock-compatible server such as PocketMine-MP or another compatible server solution. In that case, install plugins built specifically for your server software. PocketMine-MP plugins and Nukkit plugins are not interchangeable, and Java Edition mods for Forge, Fabric, or NeoForge belong to a different ecosystem and aren’t used on mobile/Bedrock servers.
Using incompatible plugins or mods can prevent your server from starting or cause unexpected issues, so always verify that every plugin or mod is designed for your specific server software and Minecraft version.
2. Download only from trusted sources
Always download plugins or mods from reputable repositories or the official developer whenever possible. Before installing anything, verify that it supports both your Minecraft version and your server software. Taking a minute to check compatibility now can save you from crashes, startup errors, or broken functionality later.
3. Install the files
The installation process depends on the server software you’re using:
PocketMine-MP
- Download plugins from a trusted PocketMine repository.
- Copy them into the plugins folder.
- Restart the server.
Nukkit
- Download compatible
.jarplugins from a trusted Nukkit repository. - Place them in the plugins directory.
- Restart the server.
Java Edition
Java mods built for Forge, Fabric, or NeoForge require the appropriate mod loader and cannot be used with PocketMine-MP or Nukkit servers.
4. Configure and test
Restart the server after installation so the new plugin or mod can load properly. Review any configuration files created by the plugin or mod, adjust the settings if needed, and join the server to confirm that everything works as expected before inviting other players. If you encounter errors, remove the most recently installed plugin or mod and verify that you’re using a compatible version.
Configuring Server Settings, Such as Difficulty and Game Mode
Once your server is running, it’s worth spending a few minutes fine-tuning the gameplay experience. The right settings depend on who will be playing, how challenging you want the game to be, and whether you’re building a private world or a larger community server.
1. Choose the right difficulty
Minecraft offers four difficulty levels, each designed for a different type of gameplay:
- Peaceful removes hostile mobs and is ideal for younger players, creative builds, or relaxed multiplayer sessions.
- Easy introduces survival mechanics while keeping combat relatively forgiving.
- Normal provides the balanced experience most players expect.
- Hard makes combat, hunger, and survival mechanics significantly more challenging.
For most private multiplayer servers, Normal is a good starting point because it offers a balanced gameplay experience without being overly punishing.
2. Select a game mode
The game mode determines how players interact with the world.
- Survival focuses on exploration, crafting, and resource gathering.
- Creative gives players unlimited resources for building.
- Adventure is designed for custom maps with predefined objectives.
- Spectator lets players observe the world without interacting with it.
Choose the mode that best matches your server’s purpose. Many administrators also allow different game modes only through operator commands.
3. Review additional gameplay settings
Besides difficulty and game mode, consider adjusting options such as maximum player count, PvP, spawn protection, mob spawning, command permissions, or whitelist access. These settings help balance gameplay while improving security and preventing unwanted changes to your world.
4. Test your configuration
Before inviting friends, join the server yourself and verify that the gameplay matches your expectations. Confirm that the selected game mode, difficulty, and any gameplay restrictions work correctly, then make any final adjustments before opening the server to other players.
Don’t worry about getting everything perfect on the first try. As your server grows, you can always revisit these settings, install additional plugins, or adjust the gameplay experience based on player feedback.
Customize Server Settings

Setting Up Server Rules and Permissions
Clearly communicating your server rules is just as important as configuring player permissions correctly. Also, always choose a permission plugin that matches the requirements of your server. Below are the basic steps to set up server rules and permissions in Minecraft:
1. Understand permissions and groups
In Minecraft, permissions allow players to perform certain actions, such as building or using specific commands. Groups are collections of permissions that can be assigned to players.
2. Choose a permission plugin
Choose a permission plugin that’s compatible with your server software and supports the features you need. Check the documentation to verify compatibility with your Minecraft version before installing and configuring the plugin.
3. Install and configure the plugin
Once you have chosen a plugin, install it on your server and configure it according to the plugin’s documentation. This may involve creating groups and assigning permissions.
4. Create roles and assign permissions
After the plugin is set up, create roles or groups for players, such as “Admin”, “Moderator”, and “Player”. Assign the appropriate permissions to each group based on their role.
5. Enforce rules
Use your permission plugin to enforce server rules, limit administrative actions, and restrict access to sensitive commands where necessary. Review your permission settings regularly to make sure players only have access to the features they actually need.
6. Communicate rules to players
It’s important to communicate your server rules clearly so players understand what behavior is expected. You can display them on your server website, community page, or in-game using the tools supported by your server software.
Basic Security Tips for Small Mobile Servers
- Keep your server private by using a whitelist whenever your server software supports it.
- Only give administrator permissions to trusted players who need them to manage the server.
- Back up your world before installing new plugins or making important configuration changes.
- Download plugins only from reputable sources and verify compatibility before installing them.
- Move to a hosted Minecraft server if your community grows beyond a small group of friends.

Backing Up and Restoring the Server World
Backing up and restoring the server world is an essential aspect of server management. In case of data loss, corruption, or damage to the server, you can always restore a backed-up server world. Here is a guide on how to back up and restore the server world:
- Stop the server: Before backing up the server world, it is essential to stop the server to avoid data loss or corruption
- Locate the server world: Locate the server world folder. This folder contains all the server data, including maps, player data, and other important files
- Copy the server world folder: Copy the server world folder and paste it in a different location. This process creates a backup of the server world
- Compress the backup: To save disk space, compress the backup folder into a .zip or .rar file
- Store the backup: Store the backup file in a safe location, such as an external hard drive or cloud storage
How to restore the Server World
- Stop the server: Before restoring the server world, stop the server to avoid data loss or corruption
- Delete the server world folder: Delete the current server world folder
- Extract the backup: Extract the backup file you created earlier into the server directory
- Start the server: Start the server, and it should load the backup world
Invite Players to the Server

If you’re self-hosting the server on your phone or another device, players connecting from outside your local network may need the server port to be reachable from the internet. Depending on your network, this can involve router port forwarding, firewall rules, or restrictions from your mobile carrier. If your network doesn’t allow inbound connections, friends outside your local network may not be able to join.
To share the server address with friends, follow these steps:
- Open the server configuration file or dashboard and look for the “Server Address” or “IP Address” section. This will display the unique address for your server
- Copy the server address and share it with your friends. You can do this by sending them a direct message, email, or any other preferred method of communication
- If the server is password-protected, provide the password to your friends as well
- Make sure that your friends have the correct version of Minecraft installed and that they are using the same version as the server
- Ask your friends to enter the server address in the “Add Server” section of the Minecraft game. They can do this by clicking on “Play” in the game menu, after which they then select “Servers” and “Add Server”
- Once the server address has been added, they can connect to the server by clicking on its name in the server list and clicking “Join Server”
Before Inviting Players, Check These Common Issues
- Confirm that the server is online before sharing the address.
- Make sure everyone is using the same Minecraft Bedrock version as the server.
- Verify both the server IP address and port number, since Bedrock servers require both.
- If you’re playing over the same Wi-Fi network, use the local/LAN address. Players connecting over the internet need a publicly reachable server address and port.
- If you’re self-hosting from an Android phone, your mobile network or home router must allow inbound connections so friends outside your local network can connect.
- Minecraft Realms and hosted Minecraft servers avoid most of these networking issues, making them the easier option for online multiplayer.
Dealing With Griefers and Other Unwanted Players

Griefing is when a player intentionally damages or destroys structures, items, or areas on a server that belong to other players, without their permission. This behavior can ruin the fun and experience for other players and disrupt the server community. It’s important to have tools and strategies in place to deal with griefers and other unwanted players.
To identify griefers or other unwanted players, you can use plugins or mods that allow you to monitor player activity or logs that track actions on the server. Some plugins or mods also provide ways to flag or mark players who have been reported for bad behavior by other players. Once a griefer or other unwanted player has been identified, there are several actions you can take to deal with them.
- Warning: Before taking any severe action, it’s always a good idea to give a warning to the player. You can warn them through chat, private message, or through a warning plugin if you have one installed. Be clear and specific about the rules they have broken and what actions will be taken if they continue.
- Kicking: If the player continues to break the rules after a warning, kick them from the server using the server controls or command provided by your server software.
- Banning: If the behavior continues, you can ban the player using the ban controls or command provided by your server software. You can choose to ban them for a specific period or permanently. Once banned, the player will not be able to rejoin the server.
How can you manage griefers and still be a good moderator?
When banning or kicking a player, it’s important to provide a reason for the action and to be consistent with the server’s rules and policies. You should also make sure to document the incident and any actions taken in case of future disputes.
To make dealing with griefers and other unwanted players easier, you can also set up a system of moderators or administrators who have the power to enforce the rules and take action when necessary. This can help ensure that the server community remains a safe and enjoyable place for everyone.
Read more about Hostinger
Managing Server Performance
Managing server performance is crucial to ensure that your Minecraft server runs smoothly and without issues. In this section, we’ll discuss how to monitor server resource usage, optimize server settings, and troubleshoot common server issues such as lag and crashes.
Monitoring Server Resource Usage
Keep an eye on your server’s CPU, memory, and network usage using the monitoring tools provided by your hosting platform or your server software. If you’re self-hosting on Android, also watch your phone’s available storage, memory usage, and battery level, since all of these can affect server stability.
Optimizing Server Settings
To improve performance, reduce the maximum player count, remove unnecessary plugins, and close other background apps if you’re hosting the server on your phone. Maintaining a stable Wi-Fi connection and keeping the device powered can also improve reliability during longer play sessions. If your phone struggles to keep up, consider moving the server to a Minecraft hosting provider or VPS for better performance and uptime.
| Problem | Possible Cause | What to Try |
| Server feels laggy | Too many players for the device | Reduce the maximum player count or move to a hosted server |
| Low FPS or slow gameplay | Phone is running both the game and the server | Close unnecessary apps or use a separate device for the server |
| Server disconnects | Weak or unstable Wi-Fi | Use a stable Wi-Fi connection instead of mobile data whenever possible |
| Server stops unexpectedly | Battery optimization or background app restrictions | Keep the phone connected to power and disable battery optimization for the server app if possible |
| Plugins slow down the server | Resource-heavy plugins | Remove unnecessary plugins and keep only the ones you need |
| Performance is still poor | Phone hardware has reached its limits | Consider moving the server to Minecraft hosting or a VPS |
Troubleshooting Common Server Issues
Minecraft servers can encounter various issues, such as crashes, lag, or plugin conflicts. In this section, we’ll discuss common server issues and how to identify and troubleshoot them. We’ll also provide tips for addressing lag and latency issues.
1. Identifying Server Errors
Common server errors include missing dependencies, plugin conflicts, and configuration errors. To troubleshoot these issues, admins can review server logs and error messages to identify the source of the problem. Additionally, there are dedicated tools that can help diagnose plugin conflicts and identify missing dependencies.
2. Fixing Server Crashes
To troubleshoot and fix server crashes, admins can review server logs and crash reports to identify the root cause of the issue. Common causes of crashes include plugin conflicts, memory leaks, and insufficient server resources. By addressing these issues, such as by disabling conflicting plugins or increasing server memory, admins can prevent future crashes.
3. Addressing Lag and Latency
To address server lag and latency issues, admins can optimize server settings, reduce entity counts, and use plugins to remove unnecessary entities and items. Additionally, you can use server management or diagnostic tools to help identify plugin conflicts and missing dependencies, and network monitoring tools to measure server latency and identify potential network issues.
Conclusion
Making a Minecraft server on mobile is possible, but the right setup depends on how you plan to use it.
- Choose Minecraft Realms if you want the easiest setup with minimal maintenance.
- Choose Minecraft hosting if you want your server to stay online, support more players, and offer greater flexibility.
- Choose Android self-hosting if you want a free option and don’t mind more setup and troubleshooting.
Start with the method that best matches your device, budget, and how often your friends need to access the server. You can always move to a more capable setup later as your needs change.


